Something else old…

Continuing the theme from the last post, I’d like to share more ideas about the interface between old and new. Clearly, there is much to address.

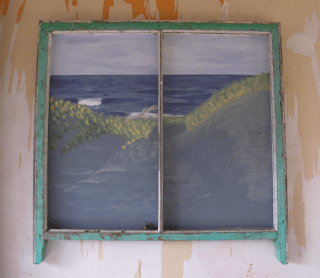
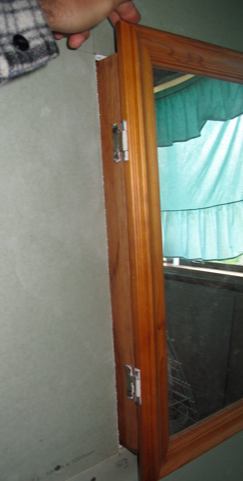
Sometimes there is no cohesive marriage of the old and new, and it makes more sense to remove or replace something no longer useful. For instance, this is the last of the villa windows. Both panes are broken and it faces south (ie, poleward here in NZ). Although beautiful, it is a major energy loser and replacing the glass would be costly.
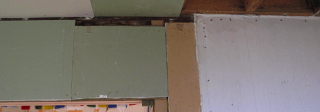
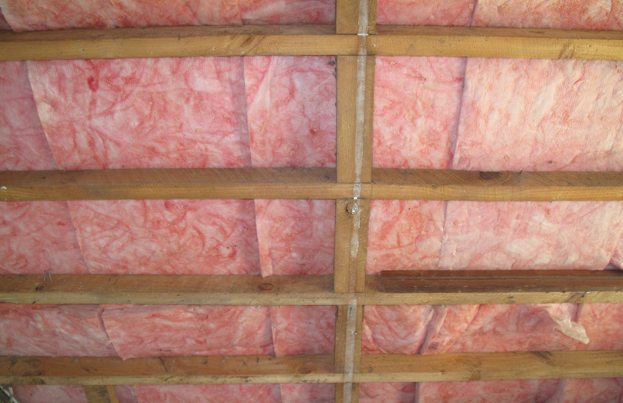
It will be removed in the same way as the old window that was in the center of the wall in the image below. The cavity will be insulated and sealed.
The window that was just to the left of the electric box faced southwest. This made it a net energy loser in winter and a net energy gainer in summer: the worst of both worlds. So we essentially “swapped” it across the house into the northeast wall.
This maintained the same amount of glazing, but this window is a net energy gainer in winter and more or less neutral in summer. As for the old rusticated weatherboards we removed to apply the new siding, some will find new life as pelmets indoors above the windows.
If you are asking yourself, “What’s a pelmet?” tune in to a post in the near future. Until then…
Peace, and pray for Perry’s Texas. Amen, Estwing

Something Old, Something New…

Forget borrowed and blue, melding the old with the new is what renovation is all about. And I would also argue that it is what sustainability, and much of permaculture for that matter, are all about. In other words, it is about carefully choosing what ‘modern’ technology to embrace while maintaining appropriate traditional materials and techniques. For instance, back on my farm in New Hampshire I had solar electric panels to power my 220 year-old farm house, but used antique hand tools including a scythe and hewing axe.
Trollbacken, Andover, NH. 2006.
One of the most sustainable properties in North America.
Here in Whanganui we are connected to the grid and I am using more power tools on this project. But we still meld the old with the new. Take GIB for example. Some of the plasterboard on our walls serves as bracing for the house. The major bracing elements must be built using Braceline GIB. (Yes, it is blue.)
Standard GIB (GS1) to the left, and Braceline GIB (BL1) to the right.
Other bracing elements require plywood. (Not borrowed.)
Plywood bracing panel with old sheet of GIB to cover it up.

We are happy to use new materials for these bracing elements, because the most sustainable house is the one that does not fall down. But in case of the Braceline GIB and the ply, non-bracing sheets abut bracing sheets, and/or go on top of them. Instead of buying new sheets of plasterboard for these, we are simply reusing many that were left laying around when we took possession of the structure. Note that these are light brown in the following shots.
Bracing sheet (left) meets non-bracing sheet (right) above the French doors.
In one case, we had leftover off-cuts of Aqualine Gib from the bathroom, so we used that as well. Note that Aqualine is treated with a fungicide and should not be used in gardens. Therefore, we wanted to use up the Aqualine off-cuts first, and then have any leftover standard GIB off-cuts for the gardens.

Aqualine GIB off-cuts fill in above the other French doors.
And, because this is a wonky reno project, an existing wall was designated to become a brace wall in the new plan. But we did not want to tear it out and then rebuild it – neither eco nor thrifty. (Note to builders: Luckily, there was sarking on both sides of this wall which, more than likely is much stronger than a GS1 brace wall.) So what we did was screw the existing GIB off in the bracing pattern as required by the building code.
Note the screw pattern on the white bit to the right.

Granted, at the moment we have 5 different colors of GIB on our walls: blue, green, grey, white and brown. But after our gib-stopper friend comes to this weekend and we get a coat of primer/sealer on them, they awkward joins will disappear.
But even having lined all of the walls, we still had more GIB leftover, in addition to the old villa window frames (cleared of all that pesky glass by helpful local enthusiasts.) And so we combined these old items in the skillful hands of Amy-the-intern to create a pair of amazing new paintings.
Thanks Amy! Now, what to do with the rest of these? Any suggestions?

Peace, (and we just passed our ‘post-line’ inspection. Yahoo!) – Estwing

Transitions

It is hard to believe that we’ve been onto this for nearly six months. But the first blast of Antarctic wind yesterday put an end to the ‘Indian Summer’ and foretold of days to come. A neighbor called it a “lazy wind.” “Doesn’t bother going around you. It goes right through.”

We spent time on the weekend further transitioning our garden from summer mode to winter mode. This included harvesting basil…

…and seeding carrots, boc choi and chives.

We also made time to save bean seeds for next year.


And we even had enough surplus for the first time to give some greens away to our neighbors.


The productivity has been amazing. This tagasaste tree was up to my knee 6 months ago when we planted it, and now it’s over my head.


The whole place has blossomed from an abandoned wreck into a home.


Life has been bountiful here at Arawa Place.


And when life gives you basil…


make pesto!

Peace, and pass the pine nuts, Estwing

Multiple Functions

A common permaculture principle – and one I employ constantly in my design work – is that any element of a system should serve multiple functions. Bill Mollison’s classic example is of a chicken. Chooks provide eggs, meat, fertilizer, pest control, weed control and ground preparations.

Although we have chooks too, this post is about feijoas.
I reckon Kiwis know about feijoas but Yanks might not. So here’s the background courtesy of…
The Feijoa (Feijoa sellowiana, synonym Acca sellowiana), also known asPineapple Guava or Guavasteen, is an evergreen shrub or small tree, 1-7 m in height. It comes from the highlands of southern Brazil, parts of Colombia, Uruguayand northern Argentina.


Our eight feijoas arrived Wednesday from the local garden center. On Tuesday, Dave the intern and I prepared the holes for them with plenty of compost and grass mulch that we harvested with the scythe. Mulch serves multiple functions such as: suppressing weeds, retaining soil moisture, adding nutrients and carbon to the soil as it decomposes.


We also use iron roofing as a temporary mulch. Since we have an abundance of it on this property, we often use it to edge a new garden to suppress the aggressive grasses that grow in this area.


Additionally, the roofing iron is preparing the next bed that will be planted in the lee of the feijoa hedge: a blueberry bed. While feijoas are wind tolerant, blueberries are not. So we have planted our feijoas in such a way as to form a wind break. Notice in the next picture that we have alternated bushy ones and treey (?!?) ones.

The feijoas will fill in to provide a future wind break for the blueberries, but also a privacy screen.


We do NOT want to put up tall iron fences like many of the local properties have. But the living feijoa hedge will act as a fence in some ways to define our property boundary, provide privacy, serve as a wind break, produce food for us, produce food for our flock, produce food for our neighbors, and enhance the beauty of the section.

So naturally, we want them to thrive. As with all plants, it starts with the soil. We have provided heaps of organic matter and compost at the roots, and mulched all around as mentioned above. Please also not the gentle bowl shape around the feijoa for easy watering. And never mulch up to the bark of a tree!


How shall I cook thee? Let me count the ways…

Peace…and feijoa wine! Estwing

Got me a new tractor.

Some of y’all be familiar with our old tractor.


The John Ducke.


But she only runs on 3 cylinders.


So we went down to the tractor supply.

And got us some parts.

Loaded up the wagon.

(Editor’s Note: Bunnings has a lumber yard 50 meters down the street.)

And built me a new tractor.

This one runs on 5 cylinders.


John Chook?

Peace, and eggs(?), Estwing

Try this at home.

Dear America,
The people of New Zealand would like to share with you the latest energy-saving technology: the solar-powered clothes dryer. It comes in many different sizes, shapes and automated settings. Also available in wireless. Free shipping. Price includes GST.
Love, NZ
Out our back windows, I can count 7 clothes lines within view. Every single one of our neighbors has one. (If you do not believe me, go on Google Earth. 10 Arawa Place, Castlecliff, Wanaganui.) They include:
Traditional.

Rotational.

Retractable.


Under the porch.


In the car port.


The double! (Below: with security system.)


Now that we have our second-hand F & P washing machine and our second-hand laundry tub, we need to decide which of these diverse models to choose from.


And you too, America, can take part in this exciting new technology. Yes you CAN, try this at home. (Batteries not included.)
Peace, and shine on, Estwing

Still Going Bananas

A month after putting in our banana, it is thriving in the heat trap (aka “micro-climate,” “sun trap”) we have built for it. The wooden fence (built from our old decking timber) acts as a wind screen, and the bricks and Hardie board cladding act as thermal sinks.

Planted in 600 mm of compost, the banana is so happy that it had a baby!

This reverse angle shows the new fence built by me and our new intern, Dave. And it shows the old fence built by Amy the intern. Note that Amy’s fence is not meant to be a wind fence, but Dave’s is. The spacing is different for each one.

Feijoas will be on the way soon.
Peace, and remember the Deepwater Horizon, Estwing

Bridge to Nowhere

I’ve written about attention to detail regarding insulation and draft-proofing in previous posts. Today’s topic is a lesser-known factor in building performance but no less important. Thermal bridging. And attention to detail is key here as well.


This diagram does a great job of illustrating the cumulative effect of thermal bridging. Since wooden (or steel) framing has a much lower r-value than insulation, heat can flow (escape) through the studs and dwangs more quickly. In the example above, the framing makes up 1/4 of the total wall space where there is zero insulation. Since heat tends to rise, the problem of thermal bridging is even worse for ceiling insulation.


When insulation is installed between the joists, every joist becomes a thermal bridge, and the overall r-value of the ceiling is calculated as:

(r-value of insulation x area) + (r-value of joists x area)
—————————————————————-
total area

In other words, the r-value above your head is not simply the r-value as shown on the bag of insulation. If you have thermal bridging, then your r-value is lower.

We are dealing to this by using a suggestion from Ian Mayes, the Eco-Design Adviser for Hamilton City Council. (I reckon this is about the best use of rate-payers money there ever was or will be.) Ian suggests laying the batts perpendicular to the joists and covering them completely.


Not very exciting, but that’s what it looks like. But we did run into some extra challenges around the extra framing we had to add to support the solar hot water on the roof.


But we dealt to that in the same way.


Even a small layer of insulation will break the thermal bridge enough to save energy. This is what we’ve also done in the bathroom behind our home-made medicine cabinet (future post). You can see the black building paper directly in contact with the exterior cladding. Brrr.

So instead of pushing the cabinet all the way back, we’re installing a thin layer of insulation…


…and pulling the cabinet out about 25 mm (1 inch).


Please note that a frame will have to go around the medicine cabinet to hide the gap with the plasterboard. This will further disguise the fact that it hangs out into the room.

Voila! Eco, thrifty, attractive.

Peace in the Middle East (but keep the oil price high), Estwing

Blast Off!

The back yard is just full of rockets these days.


Rocket greens (arugula) in the garden and a new rocket stove on the burn. Rocket stoves are incredibly efficient for cooking. They require only small twigs and use very few of them at that. You’ll see the key to this “small is beautiful” approach to cooking in the elegant construction explained below.


One of the last projects that Amy the intern and I worked on before she left was building the rocket stove. Well, she did most of the building and I served as technical adviser and steel cutter. Here is how the process worked. First, we chose a steel drum that we got at the auction house.


Then Amy raided our recycling bin…


…and did some tin can oragami.


Then she went to the beach to collect pumice.


One of the harder parts was cutting a perfectly round hole in the barrel to minimize air flow in and out. We used a combination of hack saw and roofing snips (the kind with curved blades) with great success.


We inserted Amy’s oragami “stove pipe” into the drum and packed it with pumice for insulation. From what I understand, it is key to use a “light” material like pumice instead of a “heavy” (dense) material like sand. That way the heat from the twiggy fire heats your meal instead of the mass of the packing material inside the barrel.


In order to seal the top with a non-flammable material, we chose some off-cuts of James Hardie weather boards leftover from siding the house. Again, cutting a perfectly round hole is important to minimize air flow. We used a hole saw for this. The Hardie boards provide a nice “counter top” working surface around the stove and protect the steel drum from the rain.

And finally, we harvested some fresh broccoli from our garden and a handful of twigs from under the willow tree…and a Tui (see bottom left-hand corner).


Once again, bon apetit!

Peace in the Middle East, Estwing

It’s the Energy, Stupid!

We watched the film Gasland on the weekend.


Heart-breaking and highly recommended. That is unless you would rather watch a vampire movie than a documentary. Or you love Dick Cheney. Or have stock in Haliburton. Or you condone the exploitation of the rural poor by wealthy corporations. Or you hate banjo music. Or you get squeamish about lighting tap water on fire.


Despite the Yankees cap, Josh Fox is a rad dude who has produced an amazing film.

The film was screened at the Whanganui Environment Base on Saturday. A couple from Parihaka on the western slope of Taranaki spoke before the film about oil and gas exploration in the Taranaki region and the use of hydraulic fracturing (fracking) there. We were all surprised, especially after watching the film on the devastating effects of fracking on groundwater and human health.


As we rode our bicycles home after the film, I was pissed.


As I picked up our dinner off the solar cooker, I was pissed.


As I took a shower with our solar hot water, I was pissed.


Even as I ate my dinner underneath a thick ceiling of fiberglass insulation, I was pissed.


Why doesn’t someone do something about this energy issue?!?

Peace in the Middle East, Estwing