All posts by Estwing

Permaculture as Education

Kia Ora from Melbourne.

I am sitting in a hostel drinking instant coffee (yuck) and quickly posting before I am off for 4 days at:
This symposium brings EE researchers from around the world to think and talk about the future of research in the field. While I am pleased to have been invited, I will miss my other project, my ducks and my wife. (Also wish I could have finished putting in the wood-burning stove before I left. Stay warm, honey.)
What is exciting about being in the heart of international EE research are my constant attempts to consider it through a lens of permaculture. I am more than halfway through my dissertation and I am pleased at the way I have applied permaculture principles and ideas to every chapter. (That will be a big blog post one day in the future.) But this week – surrounded by academics – I will be curious about how the permaculture ethics apply to the field: Care for the Earth; Care for people; Share the surplus. Additionally, Australia just passed a “progressive” carbon tax, and so I’ll be keen to hear how “progressive” it actually is from the Aussies.
I apologize for not writing about gardens, insulation or weather stripping this week. And I apologize for recycling another piece of writing (see below), but I received a bit of positive feedback on it through the Permaculture in New Zealand summer newsletter.
I promise I’ll be back next week with more practical posts.
Educating Everyone

After living in New Zealand for two and a half years I finally
listened to Talkback Live. The good news is that it was not Michael
Laws. The other good news is that David Suzuki was the guest. The bad
news is that he does not mince his words regarding the fate of the
planet. The interviewer accused him of being an ‘alarmist’ to which
Suzuki replied, “Of course I’m an alarmist! I am trying to sound the
alarm so people will hear it!”

The Suzuki interview came just days after Dani and I went to a local
(bike-able) screening of the film ‘Home’ which was equally sobering.
At the end of the film, the sponsor stood up and commented on its
powerful message and urged us to “do something.” While I agree with
the encouragement to act, I take issue with its vagueness.

As educators, we need to provide the opportunities and resources for
learners of any age to take specific sustainable actions. I submit
that to be a permaculturist is to be an educator. A permaculture
practicioner who is unwilling to educate others is not a
permaculturist at all, but a survivalist. More than likely they own a
gun and 100 cases of canned beans.

After listening to Suzuki and watching the film, there would appear to
be ample reason to jump in the ute with Smith, Wesson and Watties, and
head for the hills. But as permaculturists, we recognize our survival
is only assured by the survival of those around us, and that education
is the key. Dani and I are, indeed, ‘doing something’ regarding
sustainability and education in a little corner of a little street in
a little city in a little country. But it is making a big difference
in our lives and the lives of those around us. We are permaculturists.
What else would we do?


Peace, Estwing

Rant

I am so tired of climate change deniers! I am really quite irritated at them. My tolerance has worn out. I was thinking just that last night as a thunderstorm passed over us – in the middle of winter. I know there is a difference between weather and climate, but the documented increasing incidents of extreme weather (as predicted by climate scientists) indicates a changed climate. Fed up with certain local deniers, I wrote the following for our local currency (River Exchange and Barter System) monthly newsletter.

What is it called when someone predicts something and then they are right about it? Success? Do we call it success?

What do we call someone who has studied something for decades and is at the cutting edge of research in that field? An expert? Do we call them an expert?

It would appear that the “experts” of climate change (ie scientists) have experienced a good deal of “success” lately. Lets take extreme weather. The climate scientists predicted that global warming would lead to increasing incidences of extreme weather world wide. A number of peer reviewed papers have been published confirming this prediction quantitatively. But their success is our failure. Weather extremes cost individuals, governments and economies tens of billions of dollars annually. Just as REBS seeks to enable a strong local economy less vulnerable to volatile forces outside our community, what would it look like for Wanganui to protect itself from the volatile forces of climate change and the associated extreme weather?

Many of you will have seen your home owner insurance premiums skyrocket because of the Christchurch earth quakes and increases in reinsurance costs. What happens when the reinsurance costs of climate change pile on top? Plus rates increases to fix municipal infrastructure damage? And a compromised NZ economy due to impacts on agriculture?

Maybe it is time to listen to the “successful” “experts” and act accordingly.

Peace, Estwing

Memories

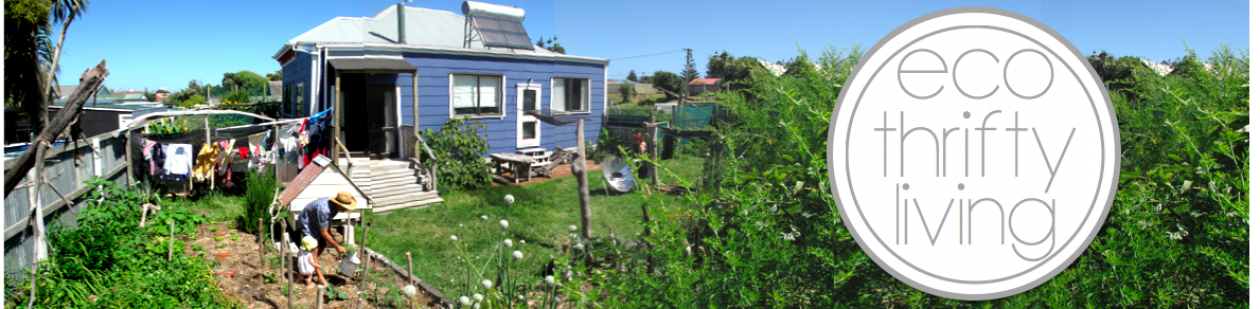
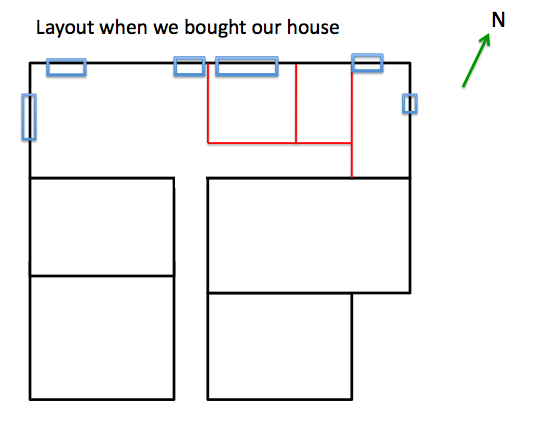
I was reminded recently that I have now spent three full years living and studying in New Zealand. I came to pursue PhD research in permaculture education at the University of Waikato in Hamilton. Before I enrolled in December, 2008, Dani and I spent 3 months house sitting in Wanganui. We liked the city and our friends here so much that after 2 years in the Hamilton area (2009 & 2010), we moved back to Wanganui and started this project while I write my dissertation. But those aren’t the memories I’m talking about.
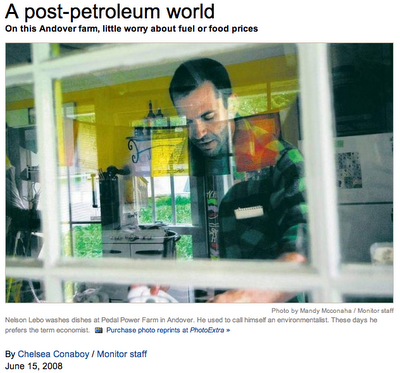
Just before flying into Auckland in June, 2008, I just missed my 15 minutes of fame back in New England. As I was sitting in the LA airport waiting to catch my connecting flight, I got an email from a TV news reporter from Boston. He wanted to do a story on my farm based on a recently published article in the Concord Monitor.

With gas at $4 per gallon, most people in New Hampshire can feel their wallets draining along with their car tanks. Not Nelson Lebo. He doesn’t have a car. He’s not worried about the cost of home heating oil either. And soaring food prices? Not much of a problem.

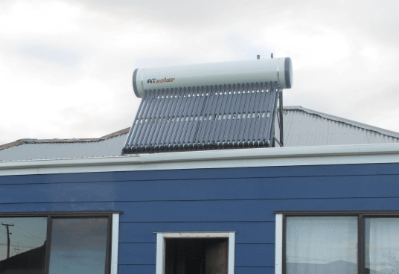
Lebo, 40, lives in a 1782 farmhouse in the woods of Andover that he has dubbed Pedal Power Farm. He heats it with wood cut from the property. He gets around on a bicycle. He grows much of his own food and buys locally otherwise. He gets his electricity from solar panels.

Lebo is no typical homesteader, content to stay tucked away in the woods, living off his land. He thinks he has ideas the rest of us could use. And he’s ready to share them.

“I’ve been living in a post-petroleum world for the last 18 years,” he said. “Everyone else is going to start living in a post-petroleum world next year.”

Lebo has been a fixture in Andover since he was hired to run Proctor Academy’s environmental program in 1991. He stopped working at the private school last year because of a herniated disk, but he still manages the organic gardens there. He was a part-time dorm parent this year.

But his teaching days are far from over. Let Lebo talk, and he will engage you for hours – he verges on ranting – about energy policy, American consumerism and the design principles around which he has built his life. One thing you won’t hear much of is a holier-than-thou attitude.

He said he doesn’t want to make people feel guilty about how they live. (He pointed out that he wears his hair in a crew cut and used to coach football, evidence of his own mainstream credibility.) He wants to encourage people to live differently. That, he said, is his “duty and obligation.”

He and girlfriend Dani Lejnieks are moving

to New Zealand this summer, where Lebo will pursue a doctorate in environmental education, looking at how to apply permaculture principles – which say that human societies can be designed to mimic natural systems – to education.

Lebo thinks people should have less of an impact on the Earth as they become better educated. The way he sees it, most people become bigger consumers as they become bigger earners.

During his last few weeks in Andover, Lebo has been holding seminars at the farm, inviting a few people at a time to see how he lives. He has gone to some attendees’ homes afterward, charging $40 per hour, to help them find ways to conserve energy. Some of his clients have been focused on living greener. Others want to save money.

Lebo said he used to call himself an environmentalist.

“Now I tell people I’m an economist,” he said. “And not only that, I’m a conservative economist.”

After years of being perceived as “just the kook at the end of the road,” he said, his ideas – his way of living – are in high demand.

“It feels like my whole life has come to this moment,” he said.

A ‘lazy farmer’

Modern society has been designed around fossil fuels, Lebo said as he stood in front of his home on a recent sunny afternoon. But those fuels are running out.

“We, as a culture, will look back in 100 years and curse the designers,” he said.

A moment earlier, he was praising one designer: the man who built his Old College Road home 226 years ago. He noted that the house, which he bought eight years ago, faces southeast, so the first rays of morning sun hit the front windows. The chimney in the center of the Cape-style home heats the whole house and is insulated from the cold.

The road in from Route 11 climbs a hill past several large, regal Victorian homes and sweeping green fields. It turns to dirt and narrows once and then twice, becoming bumpy and dark under the thick canopy of trees. The road crests a hill and continues into the small valley where the farm sits.

Story continues if you are interested: http://www.concordmonitor.com/article/post-petroleum-world?CSAuthResp=%3Asession%3ACSUserId%7CCSGroupId%3Aapproved%3ABA4A9537C4BF4594E11F4B09D8217743&CSUserId=94&CSGroupId=1

It is not 100% accurate, but it gives the idea of what my farm was all about.
Peace, Estwing

Act Locally, Share Globally

I am a natural skeptic about new technology. I am not an “early adopter.” I am more Amish in my approach – carefully weighing the costs and benefits before choosing what is appropriate. The technologies we’ve chosen to embrace for this project have well-documented results for return-on-investment in terms of energy savings. Examples are insulation and solar hot water.
Education also embraces certain technologies. And naturally, I am skeptical about those as well. It took me years to appreciate the power of blogs and podcasts. But now I am sold on their educational value. One of my favorite podcasts is called Two Beers with Steve.
I have done a number of interviews with him in the past, but this one is designed to coincide with my do-dig garden series: Part 1, Part 2, Part 3.
While I remain skeptical about much of the use of the internet, I think it has been a great help to us sharing the success of this project with a world wide audience. Our goal is to demonstrate that being green is not expensive. On the contrary, not being green is expensive! We enjoy a high quality of life with very low energy and food bills, and we are actively involved in making our local community more sustainable. Some of our experiences may be considered useful by someone on the other side of the planet. The web allows us to share our story with them with a very low carbon footprint.
So as the environmental movement evolves, I propose the next stage of evolution involves acting locally and sharing globally. Governments and corporations won’t do it for us. We need to help one another learn how to be green and save some green.

Peace, Estwing

Update 3: The back half of the house

This is the third and final post in the Update Series, giving you a glimpse of our progress on the project over the past 8 months. The first post talked about the exterior of the house, the second about the front half of the interior, and this post will focus on the back half of the interior.

This part of the house, a lean-to added to the house around 1915-1920, was in a state of disrepair when we arrived. A previous owner, or several of them, had begun renovating the space. When we bought it, it had been divided into several small rooms on the north-eastern side and one larger room on the north-western side. We quickly made plans to swap this around to take advantage of the sun’s free energy (and to block it out when we don’t want it).

This is what the large room in the northwest looked like when we arrived. It had been used as a kitchen.

We constructed a wall (reusing the studwork from other walls we took down) to close off this room. It would be our new bathroom. We made sure to move the heavy cast-iron bath in before we put up the wall. (Every once in a while we go about things in the right order!)
We then removed the old kitchen cabinetry and brought in a toilet, vanity, washer and tub. Kiwi homes traditionally have a small toilet room separate from the bathing room. We opted against this, because we thought having one big room would allow us to use the space in more ways. We can now dry our clothes in here on damp days, and were able to position our heavy tub to catch the sun’s rays from a northwest window, acting as thermal mass.
We then removed the window that faced southwest. This was a net energy gainer in the summer and a net energy loser in the winter. Quite the opposite of what we were aiming for.

And finally, this is the stage we are at now. We’re fairly close to being done in this room (which is very exciting after living with only a camping shower since October). Just a few finishing details to get to before we have (finally!) a fully functional and beautiful bathroom!

Moving along the house, we get to the back door. Although, do you still call it a door when it is boarded up with iron so you can’t get out, but still manages to let a huge amount of rain in. Let’s call it our “back weather inlet”. First step was to reframe the door and fix the damaged wall.
We then built the bathroom wall, creating a back entry-way that would help insulate our cozy house against harsh winds and cold weather in the winter. It would also be a handy place to store garden tools, boots, our solar cooker, and potentially a hot water heater.
But it turned out that our solar hot water cylinder lives on the roof, so our closet can now get used for storage. It’s actually the only closet in the whole house. This picture is kind of confusing, but this is how the back entry way looks now. Our closet door is on the left and our two back doors (storm door and inner door) are shown under a home-made pelmet. Gum boots to the right and tools tucked in the corner to the left. We have yet to add a door to seal off this room, but when we do, I am hoping to find a glass one that will let the light into the hallway.

Alright, so finally we get to the new kitchen. As you can tell from the below pictures this was all studwork when we arrived.

It was tough to get a full shot because it was so narrow and dark, but this is a view moving down the length of the room, ending at the pièce de résistance.
In a show of manly strength and strength of stomach, Nelson removed the toilet and the water damaged wall beside it.

He then framed out the doorway for our custom aluminium french doors. These will provide a second entrance to the back of the house, while simultaneously letting more light and warmth into the northernmost corner. The new exterior doors, combined with an added doorway from this room into the lounge, creates a much more light, warm, and livable living space.
Then it was time to add the insulation.

And finally, this is what the kitchen looks like now, panning along the same view as the combined shot above.

We have since plastered and painted an undercoat. As I write, Nelson is pouring the foundation for our Shacklock multi-fuel stove, which will serve cooking and heating functions. We still have decisions to make about cabinetry and flooring, but we’re getting closer.
And so that’s where we’re at. The 8 months have gone by quickly, and to be honest it is surprising to see the progress when we lay it out in pictures like this. It’s a bit of a motivation booster! I think we can, I think we can. The finish line is in sight (although given my husband’s love of creativity, I have a feeling this house will never really be “finished”).

What have the past 8 months brought your way? What are you most proud of accomplishing since November?


-June Cleverer

No-Dig (Part 3): Ground Preparation

In the first post of this No-Dig series I described how decompressing the soil with a garden fork is the first step of the process. While that’s true, there are some ways to prepare the site even before forking it over. Currently we are “tractoring” ducks…

…and chooks in areas where we plan to install beds. The fowl eat the grass and fertilize the future garden bed. Because we have two particularly aggressive grasses and other invasive weeds, it is important for us to knock them back before putting in new beds.

After the birds have done their job, the former lawn looks something like this. (Note the banana peels. We get “baking bananas” for $2 a box from a local veggie shop. We eat some and feed some to the ladies.)
But you may not have birds or even want them. Or maybe your municipality is even silly enough to outlaw them. Other techniques I’ve used include covering the ground with black plastic for extended periods of time (1 month to 4 months). Because plastic is UV sensitive, I extend its useful lifetime by covering the plastic with weeds. This serves multiple purposes. Along with making the poly sheets last longer, it is a way to dry out the weeds for later use as mulch and it looks much more attractive than a sheet of plastic laying in the yard.
And finally, to continue the local, abundant and free theme from the two previous posts, we happen to have heaps of roofing iron on our section. We use it to knock back aggressive grasses and weeds before bed building. Just make sure you weigh it down to protect against gusting winds.


Referring back to the first post in this series once again, the bed that I built on the solstice started out looking like this.


The iron had been there for about 3 months and the pile of topsoil on top of the Pink Batts plastic had been there for about a month. Although you can see a little bit of cacuya grass between them, I pulled that foliage off before placing an extra thick layer of newspapers there.
And in no time 100 garlic were in the ground.
An easy no-dig installation should be part of an easy, low-maintenance/high-productivity management system. And the key to that, in my decade plus of experience, is managing weeds. Two important parts of easy weed management are never stepping in the beds (see #1 in this series) and building in low maintenance edges (see #1 in this series).
I have run many workshops in 3 different countries on low-maintenance/high-productivity organic management. If you would like to host one in your area, please contact us. If you are a publisher, this management system is waiting for a book deal.
It is a great time to be building beds in both the Southern and Northern Hemispheres. Get on to it!

Peace, Estwing

No Dig (Part 2): Pocket Garden

This is a technique I developed a few years ago that is fast, inexpensive and attractive. The materials you need are: wet newspapers, a trowel, a bucket of compost, an empty bucket, seedlings, and a bale of hay/straw.
Step 1: Lay out newspaper on the lawn as explained in the previous post, and cut a capital H in the wet newspaper with the trowel.
Or a capital I if you prefer.
Step 2: Fold back the paper like opening French doors.
And dig out the sod and soil to the volume of a 1 litre/quart yogurt container. Carefully put the soil into the empty bucket so as not to allow weed seeds in the soil on top of the newspaper.

Step 3: Fill the 1 litre/quart hole with compost.
Step 4: Plant the seedling, water thoroughly, and fold back the newspaper.
Step 5: Mulch with hay or straw.
* Note that we don’t buy in hay or straw because we use tall grasses that we cut with a scythe and harvest with a rake. I have used wood chips as a mulch on one job, but that was only as a very low-budget approach in that particular case.
With a stack of newspapers and a few bales of hay/straw you could convert an entire lawn to garden in a weekend.

Peace, Estwing

No-Dig Garden Beds (Part 1)

I’m told that in the land of the long white cloud (Aotearoa/NZ) garlic is planted on the shortest day of the year and harvested on the longest. Fair enough. That’s more or less what we’ve done for the past two years. But last week I managed to land right on the 21st. It was a beautiful day and I spent a couple of hours building a new garden bed, taking pictures, planting garlic and missing an afternoon meeting that slipped my mind. Oops.

Even though it is the middle of winter here and the middle of summer in the northern hemisphere, it is still a fine time to put in a garden bed. On my farm in New Hampshire, I remained seeding fall greens (spinach, kale, Swiss chard) through the second week in August. If you have a small garden and want to expand it, or you want to start a garden on your lawn, here are a few things I’ve learned over the last 12 years of building beds.
* Please note that we use a number of techniques to prepare the plot before putting in a new bed, but those are not required. It is quick and easy to go from lawn to garden in one afternoon. I’ll explain those prep techniques in another post.
Step 1: Decompress the soil. Assuming you’re converting lawn to garden, the soil will inevitably be compacted by years of foot traffic, mowing, etc. Use a strong (thick tines) garden fork and plunge it into the soil on an angle about like this.
Push down on the handle so that the soil is just “fluffed” a little bit as such.
Work backwards so you don’t compress an area you’ve already decompressed.
Step 2: Sheet mulch. We use newspapers (no glossy inserts), cardboard and scraps of unpainted and untreated plasterboard/drywall (Gib/Sheet Rock). It is handy to have wet newspapers, especially on windy days. You can put a stack of newspapers into a wheel barrow and run a hose over them, or…just leave them outside for a few weeks like we do.
Lay out the newspapers 3 to 6 sheets thick with generous overlap (50 to 100 mm) between each sheet. Don’t be stingy with these. In our present world old newspapers are abundant.
Here I am building the new bed adjacent to an existing bed. Edges tend to be high maintenance areas, so I design to minimize them.

Because we have some very aggressive grasses that tend to invade our beds, I “reinforce” the edge with a bit of plasterboard.
Step 3: Deciding on siding. Almost anything can be used as sides for a raised bed. You don’t even need sides at all. But many people prefer them. I like to use whatever is local, abundant and/or free. In the past I’ve used bricks, blocks, scrap wood, stone, and beams from a barn that was torn down. At present we are using a combination of concrete edging we got on Trade Me and concrete fence posts we got for free at the transfer station. I would recommend against using treated wood, but I’ve seen plenty of people do it.
Step 4: Fill ‘er up! Many people like to use a “lasagna method.” There are lots of recipes you can find by Googling. I prefer to use whatever is local, abundant and/or free. We make lots of our own compost that we use generously. But in this case we had some leftover topsoil that was just sitting in a pile conveniently next to where I decided to build this bed.
We also happened to have plenty of sheep manure that we bartered for French doors that we did not need.
I raked the soil and manure flat in the bed. Please note that I usually make beds no wider than 1.2 meters so that I can reach halfway into them from each side without ever stepping in the bed. This is crucial in low maintenance garden management. Never step in the beds!
But in this case where the bed is wider than 1.2 meters, I placed bricks as stepping stones for access to the middle of the bed.

Step 5: Plant. Depending on what techniques you use, you can direct seed or transplant into the bed straight away. Here I planted seed garlic just wider than a stirrup hoe, which is my main weed management tool.

Over time the grass under the bed will rot down into a “green manure.” The worms will happily munch away and stir it up, and the roots of your vegetable plants will thrive in the loose, fertile soils.
Other options: In the next post I’ll explain another technique that is even faster and cheaper.
Peace, and get planting, Estwing

Update 2: The front half of the house

Here is the second of three posts designed to bring you up to speed on the scope of this project so far (here’s the link back to the first post). This post will focus on the southern four rooms of our house. These rooms actually make up the original part of our house, built around 1910. The northern lean-to, which I will talk about in my next post, was added on about 10 years later.

The original house consisted of four rooms and a central hallway. These are the bottom four rooms in these layouts. They are the ones that have received the least amount of demolition and rebuild, but that’s not to say that the transformation is not dramatic.


The first time we walked into our house, we saw a hallway that stretched the length of the house. It was filled with dust, rubble, and long lengths of Hardiplank.


We have since sealed up an old doorway that was halfway down the hall and have hung a door in it. This has effectively sealed off the southernmost two bedrooms, and created an airlock in the hall entryway. Now when you walk in the front door you stand in this entry, and are greeted with our coats and boots.
When we moved in, the two southernmost bedrooms were filled to the brim with rubbish. I hate to disappoint, but they are still filled with rubbish. Only now its our rubbish. One of the rooms is serving as our indoor tool shed and the other as our indoor bike/ surf shed. They are too messy to picture. Maybe another day.

Moving down the hall (through the new doorway) you arrive at our bedroom on the left hand side. When we arrived this is how it looked:
It was stuffed full of windows, cabinet units, bathtubs, even a kitchen sink! Now it is a cozy little nest with gold curtains and a down comforter. Yummmm.

Across the hall is a room that we called “the dungeon” when we first arrived. It was dark and gloomy with dirty old carpets, moldy curtains, a massive boarded up window, and a giant hole in the floor. We didn’t do any work in here for months. I think we were afraid.
But now, thanks to some demo work, we have converted the dungeon into a great open-plan lounge off of the kitchen. There is still tons of work to do here (like flooring, wall coverings, and doors), but it is already a nice sunny place and joyful space to live in.

I think what amazes me most, is how light can play such a critical role in the transformation of a room. The rooms in our house that were originally our favorites to be in are now the ones where we spend the least amount of time. And ones that we avoided initially, have become our living spaces.

Our intention was to design based on the principals of passive solar, making the most of the sun’s energy to heat our home. But through the remodel we have ended up with a house that is not only warmer and lighter physically, but also more comfortable and joyful emotionally.

So what do you think? Are you surprised by our progress? Did you think we’d be further along by now? Any words of advice as we get to the “finishings”?

-June Cleverer

Intersections

I reckon life is all about finding balance. And because we live in a dynamic world, the balance point is always changing. On this project we are looking for balance not only between eco and thrifty, but also factoring in the New Zealand building code and the potential for wide applicability across society and across the world. In other words, we are looking for the intersection of eco, thrifty, legal, replicable, beautiful and attractive to people other than already committed Greenies.


To my knowledge this is a unique endeavor. This project represents an everyman’s/woman’s approach to permaculture. There are lots of examples of eco-villages and perma-farms and expensive bespoke eco-homes. But in the foreseeable future, the vast majority of people will never live in such places. Most people in OECD nations live in places like this.


Well, much nicer than this actually. But we did not want to be accused of cherry-picking.


In response to Richard’s comment on the last post, I’ll give an example of the intersection mentioned above using insulation. Pink Batts are widely available, recognized by almost everyone, cost-effective, meet the NZ building code and contain up to 80% recycled content. Meeting (and exceeding) the NZ building code is essential to this project. So the options of insulation included Pink Batts, polypropylene batts, and wool batts. (We did not consider blown in cellulose too closely because we wanted to do the job ourselves to ensure quality installation and to keep costs down.) Polypro batts are made from recycled plastic and the wool batts are made from…wool. Both are more expensive and less available than Pink Batts.

Some people like polypro batts because they are so soft and easy to handle. But in terms of insulation, handling should be (!) a one off. I do not mind handling Pink Batts. Once they are installed, I don’t plan to touch them ever again.

Some people claim that wool batts are the most eco option possible. I question that thinking. Have you seen the unsustainable ways sheep are grown in NZ? A holistic look at the ecological footprint of wool batts must include soil erosion, herbicides, and nitrogen fertilizers. Some might argue that the ecology, soil health and water health of NZ would be much better off with fewer sheep.


In the end, the insulation intersection for this time and place and the goals of this project was Pink Batts. For the equivalent cost of polypro or wool we were able to exceed the building code at a higher r-value. In other words, we have a warmer house at the same cost. By using an innovative installation technique (see Bridge to Nowhere), we reap the benefits and can share this under-utilized approach with others to replicate from Auckland to Alberta.

Peace, Estwing